Prepare Environment
Setup your LearnFest Environment
The lab requires the following setup which will be deployed into an AWS account:
- Automation Controller
- Private Automation Hub
- 3 Managed Nodes
Students will need the following information to start the automated deployment of their personal lab environment:
- AWS credentials, either from a RHDP AWS Blank Open Environment or bring your own
- RHN user name and password for log into RHN Subscription Management
- RHN Pool ID with an active Ansible Red Hat Automation Platform Subscription, typically it’s the pool ID of your “Employee SKU”, or “Red Hat Ansible Automation Platform”
If you attend an instructor led Ansible LearnFest, we will provide AWS credentials for you.
Prepare student environment deployment
Your instructor will provide access credentials for the Ansible LearnFest automation controller, log in. Navigate to the Job Template LearnFest - Create Student environment, launch it and fill in the survey.
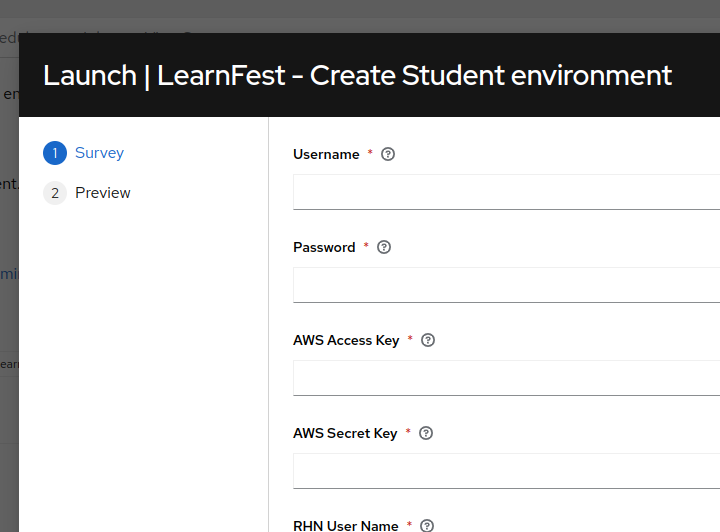
Click image to enlarge
Enter the data into the following survey fields:
- Username: the user name you want to be created, you will use this to log into the LearnFest automation controller in the next step to manage your infrastructure
- Password: the password for your user, this will also be the password you later use to log into your environment
- AWS Access Key: the key to log into your AWS environment, this will be sent to you when your order your RHPDS Open Environment, or you use your own. This determines into what AWS account your lab env will be deployed!
- AWS Secret Key: the secret key for your AWS account
- RHN User Name: your username to log into RHN Subscription Management, this will be used to register your system
- RHN Password: your password to log into RHN Subscription Management, this will be used to register your system
- RHN Pool ID: a pool ID granting you access to the Red Hat Ansible Automation Platform repository, typically it’s the pool ID of your “Employee SKU”, or “Red Hat Ansible Automation Platform”
Click Next and verify all details. Then click Launch. You will be redirected to the Playbook output and you can monitor the progress.
This will create customized job templates in the Ansible LearnFest automation controller you will use in the next step to actually deploy and manage your lab environment
After the job completed
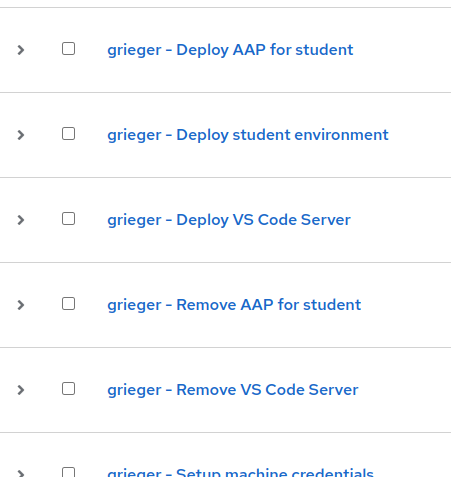
After the job has finished, log into the same Ansible LearnFest automation controller with the credentials you just specified in the survey!. This Playbook created the following items:
- your personal user account in automation controller with the username and password you specified
- Credentials to the AWS account you specified
- a dynamic inventory for your AWS account you specified
In addition you’ll see the following new job templates:
- Workflow Template Deploy student environment which will deploy Red Hat Ansible Automation Platform into your AWS account including three instances which can later be used as managed nodes
- Job Template to deploy AAP (controller and private automation hub): Deploy AAP for student - use this if you just need to reset your AAP, for fresh deployment use the workflow instead
- Job Template to deploy Visual Studio Code Server: Deploy VS Code Server - see more details below
- Job Template to completely delete your AAP deployment: Remove AAP for student - only use this if your environment is utterly broken and can’t be fixed, or if you want to clean up
- Job Template to completely delete your VS Code Server: Remove VS Code Server - only use this if your VS Code server is utterly broken and can’t be fixed, or if you want to clean up
- Job Template to create machine credentials in your automation controller: Setup machine credentials - you usually don’t launch this directly, use the Deploy student environment workflow instead
Click image to enlarge
All deployment playbooks are idempotent and can be launched again if needed, e.g. to fix a broken installation.
Deploy Automation Platform
After log in as your user you will notice that a workflow job Deploy student environment is already running! This will deploy your lab environment and takes 30-45 minutes to complete!
If your deployment job fails, try it again and Ansible should fix the problem automatically. Since we heavily use cloud services, it’s unfortunately out of our control that some services sometimes have a hick up and fail - most of the time if you try again, the job will succeed. If it still fails again, reach out to your instructor.
To get an idea what’s going on, the playbook will perform the following actions (and some more):
- create a VPC, security group, SSH keys etc. in your AWS account
- create an instance for automation controller and a second one for automation hub in your AWS account
- install Ansible Automation Platform on the controller and hub
- create three instances (node1, node2, node3) you can use later as managed nodes
The deploy playbook is idempotent - in case of an error you can launch it again safely.
After Deploy student environment has finished
After the deployment workflow has finished, you can start to use your own AAP installation deployed to your AWS account with the following details:
- Automation controller: controller-<username>.learnfest.ansible-labs.de
- Private automation hub: hub-<username>.learnfest.ansible-labs.de
- Username: admin
- Password: the one you set in step Create student environment
Optional VS Code Server
You can use your own machine to write all the code necessary for participating in the LearnFest. For this, you will need the following tools:
- VS Code or any other editor you feel comfortable with
- VS Code Ansible extension: recommended, but not required
- ansible-navigator
- ansible-builder
If you don’t have a system available with these tools, you can launch the Deploy VS Code Server from the LearnFest automation controller. This will deploy an instance with the Web Version of VS Code pre-installed into your AWS account, here you can open a terminal session.
You can access your VS Code Server with the following details:
- VS Code Server: vscode-<username>.learnfest.ansible-labs.de
- Password: the one you set in step “Prepare student environment deployment”